There’s something romantic about trains. The rhythmic clatter of wheels on tracks. The sense of adventure. The nostalgic charm of a bygone era. Now imagine taking that romance home with you—literally. Railway carriage homes are capturing hearts around the world, transforming vintage train cars into stunning tiny houses brimming with character and history.
You’re about to discover how to turn a decommissioned railway carriage into your dream dwelling. From sourcing the perfect carriage to tackling structural challenges, permits, and design inspiration—this guide covers everything you need to know about living in a converted train car.
Why Choose a Railway Carriage Home?
Converting a railway carriage into a home isn’t just about hopping on a trend. It’s about embracing a lifestyle steeped in history, creativity, and resourcefulness.
Unmatched Character and Charm
Every railway carriage carries decades of stories. Those weathered wooden panels, original fixtures, and industrial details create an atmosphere no modern construction can replicate. Your home becomes a conversation starter, a living piece of history.
Structural Advantages
Railway carriages were built to withstand extreme conditions. Heavy-duty steel frames. Robust construction designed for decades of service. You’re starting with a structure engineered for durability. Living Big In A Tiny House
Pre-Existing Long Layout
Train carriages offer naturally long, narrow floor plans—perfect for tiny house living. The railroad-style layout encourages open-concept design. No need to build walls from scratch. Work with the existing compartments or open them up entirely.
Eco-Friendly Recycling
Rescuing a railway carriage from the scrapyard is the ultimate upcycling project. You’re giving new life to materials that might otherwise become landfill waste. Sustainability meets style.
Cost Savings (Sometimes)
Purchasing a railway carriage can be cheaper than buying land and building from scratch. Prices range from $2,000 to $50,000 depending on condition, location, and rarity. The shell is sorted—you’re paying for renovation, not foundation work. Mother Earth News
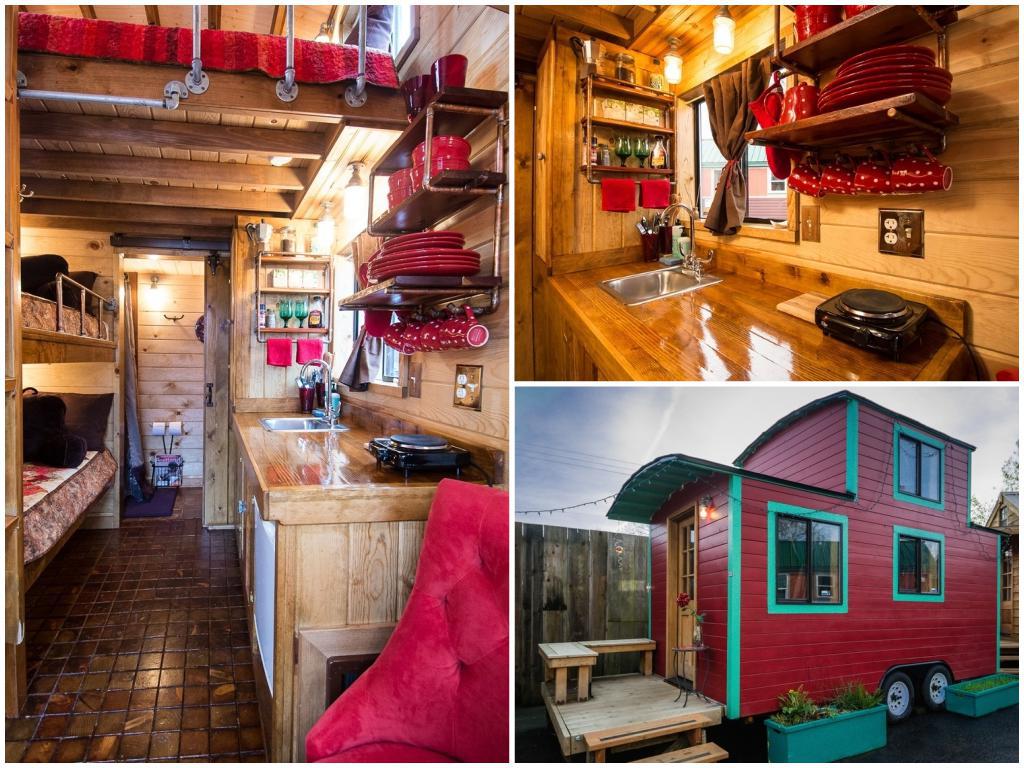
A beautifully restored railway carriage showcasing original details mixed with modern comforts
Types of Railway Carriages for Conversion
Not all train cars are created equal. Your choice depends on your vision, budget, and location.
Passenger Carriages
These offer the most livable spaces right from the start. Windows line both sides. Interior compartments provide natural room divisions. Victorian-era passenger cars ooze ornate charm. Post-war models offer simpler, more modern lines.
Pros: Built for human comfort, existing windows and partitions, historical appeal
Cons: Can be expensive, harder to find
Cabooses
The quintessential American train car. Cabooses served as mobile offices for train crews. They’re smaller than passenger carriages but packed with personality. The cupola (observation dome) makes a stunning architectural feature.
Pros: Iconic design, manageable size, good resale value
Cons: Limited floor space, specialized features need creative repurposing
A vintage caboose transformed into a charming tiny home
Freight Cars (Boxcars)
Utilitarian and affordable. Boxcars lack windows and interior finishes. You’re starting with a blank steel canvas. Perfect if you want complete design control.
Pros: Cheap, abundant, totally customizable
Cons: No existing amenities, requires extensive window installation, industrial aesthetic
Military Train Cars
WWII-era military carriages are gaining popularity. Built tough for troop transport. Often available at reasonable prices through military surplus auctions.
Pros: Sturdy construction, historical significance, good availability
Cons: Basic interiors, may need significant modification
Finding and Buying a Railway Carriage
You’ve decided to go ahead. Where do you actually find a train car for sale?
Online Marketplaces
Start with eBay, Craigslist, and Facebook Marketplace. Search for “railway carriage,” “train car,” “caboose,” or “passenger car.” Specialized sites like Sterling Rail (sterlingrail.com) list railroad equipment specifically. Tiny House Society
Railroad Companies and Scrapyards
Contact purchasing agents at local railroad companies. When they retire rolling stock, they’ll sell to private buyers. Scrapyards dealing in railroad equipment are goldmines. You’ll need to act fast—good carriages go quickly.
Railroad Museums and Historical Societies
Sometimes museums deaccession carriages. Historical railroad societies often know about available cars. Join online railroad enthusiast forums, insiders share leads.
Auctions and Estate Sales
Government surplus auctions occasionally feature military train cars. Estate sales of railroad collectors can yield unexpected finds.
What to Look For
- Structural integrity (check for rust, especially undercarriage)
- Roof condition (leaks are your worst enemy)
- Window frames (replacements are expensive)
- Flooring (rotted floors mean major work)
- Historical significance (increases value)
- Transportation logistics (can it be moved to your site?)
Price Ranges
- Basic freight cars: $2,000-$5,000
- Cabooses (steel): $2,000-$15,000
- Passenger carriages (fair condition): $10,000-$30,000
- Restored or rare models: $30,000-$100,000+
Transportation and Site Preparation
You’ve bought your railway carriage. Now comes the logistical puzzle: getting it home.
Transportation Methods
Moving a railway carriage requires specialized equipment. Most weigh 20-50 tons. Standard options:
- Rail Transport: Cheapest if your property has rail access (spoiler: it probably doesn’t). Costs $2-$5 per mile.
- Flatbed Truck: Most common method. Specialized heavy haul trucking companies handle this. Expect $5-$15 per mile plus permits for oversized loads. A 100-mile move runs $1,000-$3,000.
- Crane and Low-Boy Trailer: For difficult sites. Crane lifts the carriage onto a low-profile trailer. Adds $2,000-$5,000 to total costs.
- Barge or Ship: For waterfront properties or island locations. Expensive but sometimes necessary.
Site Foundation Options
Railway carriages need stable foundations. Your choices:
- Concrete Piers: Most common. Pour concrete footings at regular intervals matching the carriage length. Elevates the car, preventing ground moisture issues. Cost: $2,000-$5,000.
- Railroad Ties on Gravel: Budget option. Lay parallel rows of railroad ties on compacted gravel. Level carefully. Cost: $500-$1,500.
- Full Concrete Slab: Overkill but permanent. Creates finished floor beneath the carriage. Cost: $5,000-$10,000.
- Steel I-Beams: Industrial look. Weld the carriage directly to I-beams set in concrete footings. Cost: $3,000-$7,000.
Site Preparation Checklist
✓ Clear and level the site
✓ Check local setback requirements
✓ Plan utility routing (water, sewer, electric)
✓ Create access road for delivery truck
✓ Obtain permits BEFORE delivery
✓ Schedule crane if needed
✓ Have foundation ready for immediate placement
Converted railway carriage positioned on proper foundation
Legal and Zoning Considerations
Here’s where dreams meet reality. Converting a railway carriage into a home involves navigating complex regulations.
Zoning Classifications
Most jurisdictions classify railway carriages as:
- Recreational vehicles (RVs)
- Mobile homes
- Non-standard structures
- Accessory dwelling units (ADUs)
Your classification determines where you can place it. Many residential zones prohibit RVs as primary residences. Rural agricultural zones tend to be more flexible.
Building Permits
You’ll need permits for:
- Foundation work
- Electrical installation
- Plumbing modifications
- Structural alterations
- Septic or sewer connections
Some counties treat railway carriages like manufactured homes—requiring special inspections. Others consider them recreational structures with looser codes.
Common Restrictions
- Minimum square footage requirements (railway carriages often fail)
- Connection to municipal utilities (some areas prohibit off-grid living)
- Aesthetic standards (historic districts may have strict rules)
- Accessory structure limits (using as a guest house vs. a primary dwelling)
Strategies for Success
Apply for accessory dwelling unit (ADU) status. Present detailed renovation plans showing that the carriage meets building codes. Seek variance or exemption for historic structures. Choose a property in rural areas with minimal restrictions. Reddit Legal Advice
Insurance Challenges
Standard homeowners’ insurance doesn’t cover railway carriages. You’ll need:
- Specialty mobile home insurance
- RV insurance (if classified as a recreational vehicle)
- Custom tiny house insurance
- Separate policies for structure and contents
Shop multiple carriers. Expect higher premiums due to the non-standard nature.
Structural Challenges and Solutions
Railway carriages weren’t designed as stationary homes. You’ll face unique challenges.
Insulation: The Biggest Hurdle
Steel railway carriages are thermal conductors. Summer sun turns them into ovens. Winter cold penetrates instantly. Metal sweats, creating condensation and mold issues. Railway Gazette
Solution: Spray foam insulation is your best friend. Apply closed-cell spray foam directly to interior walls and ceiling. This creates a vapor barrier and insulation in one step. Budget R-19 minimum for walls, R-30 for ceiling. Cost: $3,000-$8,000 for full carriage.
Alternative: Rigid foam boards (XPS or polyiso) plus vapor barrier. Cheaper but more labor-intensive. Frame out walls to create air gap, reducing condensation.
Heating and Cooling Systems
Small spaces in extreme temperatures need efficient climate control.
Best Options:
- Mini-split heat pumps (efficient heating and cooling)
- Wood stove (aesthetically perfect, excellent heat)
- Radiant floor heating (if you’re building new floors)
- Portable AC units (budget option for cooling)
Avoid: Space heaters (fire hazard), window AC units (ruins aesthetics)
Moisture Control
Metal structures trap moisture. Prevent disaster:
- Install vapor barriers correctly (warm side of insulation)
- Use dehumidifiers (especially first year)
- Ensure proper ventilation (exhaust fans in bathroom/kitchen)
- Seal all penetrations immediately
- Check regularly for condensation
Roof Repairs
Train car roofs take brutal punishment. Rust, leaks, and deterioration are common.
Options:
- Metal roof coating (elastomeric or rubber sealant)
- Complete roof replacement (expensive but permanent)
- Adding overhang/awning (protects original roof)
- Regular inspection and spot repairs
Budget $2,000-$5,000 for comprehensive roof work.
Floor Replacement
Original floors are often plywood over steel beams. Rot and damage are common.
Standard Approach:
Remove old flooring completely. Treat steel beams for rust. Install new pressure-treated plywood. Add insulation between beams. Install subfloor and finished flooring. Cost: $1,500-$4,000.
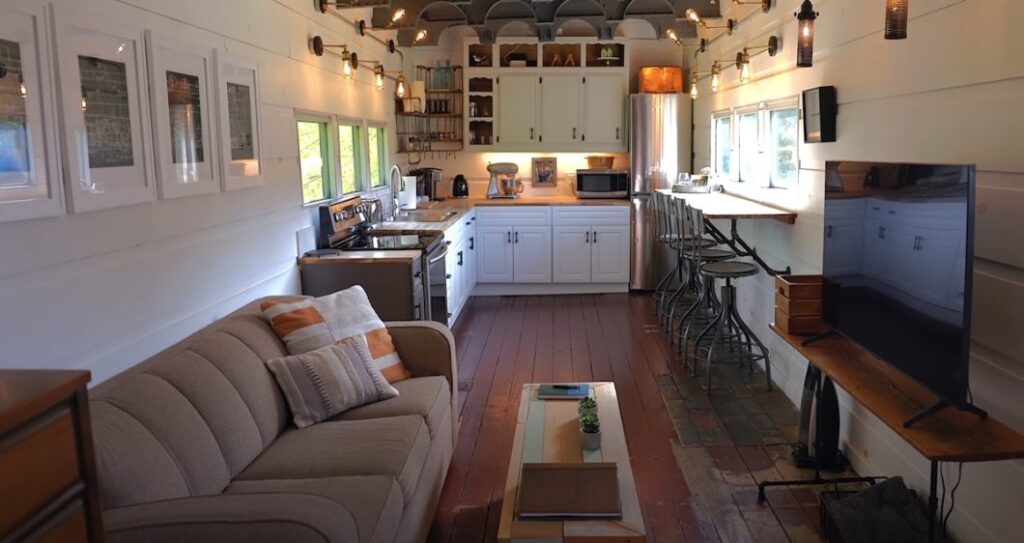
Modern kitchen fitted into vintage railway carriage structure
Design and Layout Ideas
The long, narrow shape of railway carriages demands creative design thinking.
Open-Concept Living
Embrace the railroad-style flow. Remove interior partitions for one continuous space. Define areas with furniture placement and flooring changes instead of walls. This maximizes light and creates spacious feel despite tight width.
Compartment Conversions
Preserve original compartments for privacy. Convert separate train compartments into:
- Bedroom at one end
- Bathroom in middle
- Living/kitchen at opposite end
- Each space maintains distinct character
Maximize Natural Light
Railway carriages have windows running the full length. Don’t block them. Use sheer curtains or blinds. Install skylights in solid roof sections. Paint interior bright white or light colors to bounce light.
Vertical Storage Solutions
With limited floor space, go vertical. Floor-to-ceiling shelving. Wall-mounted cabinets. Overhead storage bins. Murphy beds that fold into walls. Every inch counts.
Embrace Industrial Aesthetic
Work with, not against, the railway heritage. Expose original rivets and steel beams. Keep industrial fixtures visible. Mix vintage train elements (luggage racks, signal lights) with modern comfort. Contrast raw metal with warm wood tones.
Kitchen Design
Galley-style kitchens work perfectly in narrow train cars. Run counters and appliances along one wall. Use compact appliances:
- Two-burner cooktop instead of full range
- Apartment-size refrigerator
- Combination washer-dryer (if space permits)
- Under-counter everything
Bathroom Solutions
Tight spaces demand efficiency. Wet bath (toilet, sink, and shower in one waterproof room) maximizes space. Corner showers save square footage. Wall-mounted toilets and sinks create floor space. Pocket doors eliminate swing clearance.
Sleeping Lofts
If ceiling height permits, add a sleeping loft. This frees up floor space for living areas. Access via ladder or compact stairs with storage underneath.
Cozy bedroom space in converted railway carriage
Utility Connections and Off-Grid Options
Powering and plumbing your railway carriage home requires planning.
Electrical Options
Grid Connection: Standard approach. Hire licensed electrician to run service from utility pole or nearby building. Install main panel inside carriage. Cost: $2,000-$5,000 depending on distance.
Solar Power: Perfect for remote locations. System sizing depends on usage:
- Minimal (lights, phone charging): 1-2 kW system ($3,000-$6,000)
- Moderate (above plus fridge, laptop): 3-4 kW system ($8,000-$12,000)
- Full power (including AC, electric cooking): 6+ kW system ($15,000-$25,000)
Generator Backup: Supplement solar or stand-alone power. Propane or diesel generators run appliances during high-demand periods. Quality unit: $2,000-$5,000.
Water Systems
- Municipal Connection: Simplest option. Run water line from main to carriage. Install shutoff valve and pressure regulator. Cost: $1,000-$3,000.
- Well Water: Drill a well if municipal water isn’t available. Average well: $5,000-$15,000. Add pressure tank and filtration system.
- Rainwater Collection: Supplement or primary source. Install gutters on carriage. Direct to storage tanks. Filter for potable use. 1,000-gallon system: $2,000-$4,000.
- Water Delivery: Some rural homeowners have water trucked in. Fill storage tanks monthly. Only viable for minimal use.
Sewage and Waste
- Septic System: Standard rural solution. Install septic tank and leach field. Cost: $5,000-$15,000 depending on soil conditions and size.
- Sewer Connection: If available. Run sewer line from carriage to municipal connection. Cost: $2,000-$5,000.
- Composting Toilet: Off-grid favorite. Zero water use. Converts waste to compost. Quality units: $1,000-$2,500. (See our comprehensive composting toilet guide!)
- Greywater System: Separate greywater (sinks, shower) from blackwater. Treat and use for irrigation. Reduces overall sewage needs. System: $1,000-$3,000.
Renovation Costs: What to Expect
Railway carriage conversions range dramatically in cost. Here’s a breakdown.
Budget Conversion ($15,000-$30,000)
- Purchase basic freight car or caboose: $3,000-$5,000
- Transportation and foundation: $3,000-$5,000
- DIY insulation and interior framing: $2,000-$3,000
- Basic electrical (DIY with permit): $1,000-$2,000
- Simple plumbing: $1,500-$2,500
- Salvaged fixtures and finishes: $2,000-$4,000
- Composting toilet: $1,000-$1,500
- DIY labor: Countless hours
Mid-Range Conversion ($40,000-$75,000)
- Purchase passenger carriage: $10,000-$20,000
- Professional transportation: $3,000-$5,000
- Concrete pier foundation: $3,000-$5,000
- Professional insulation (spray foam): $4,000-$7,000
- Full electrical by licensed electrician: $5,000-$8,000
- Complete plumbing system: $4,000-$6,000
- Quality fixtures and appliances: $5,000-$8,000
- Flooring and finishes: $3,000-$5,000
- Heating/cooling system: $3,000-$5,000
- Mixed DIY and professional labor
High-End Conversion ($80,000-$150,000+)
- Rare or restored passenger car: $30,000-$50,000
- Specialized transportation and setup: $5,000-$10,000
- Premium foundation with utilities: $5,000-$10,000
- Complete professional renovation: $40,000-$80,000
- Custom millwork and finishes
- High-end appliances and fixtures
- Solar power system
- Landscape and exterior work
- Fully professional installation
Hidden Costs to Budget For
- Permits and inspections: $500-$2,000
- Insurance (first year): $1,000-$3,000
- Tool purchases/rentals: $500-$2,000
- Unexpected repairs: 10-20% contingency
- Mistakes and do-overs: Budget generously
Real Railway Carriage Home Examples
Learning from successful conversions inspires and informs your own project.
The Off-Grid New Zealand Carriages
Two derelict railway carriages transformed into a stunning off-grid home. Eight years of part-time work created a functional, beautiful dwelling. Features include solar power, rainwater collection, and panoramic views. The owners preserved original details like luggage racks and signage while adding modern comforts. Living Big In A Tiny House
WWII Military Train Car Conversion
A World War II troop transport carriage became a cozy tiny home. The owner embraced the military heritage, keeping the utilitarian aesthetic. Industrial fixtures, metal finishes, and olive drab accents honor the car’s history. Modern amenities hide cleverly within the vintage shell.
The Cornwall Railway Retreat
A 1940s rail carriage in Cornwall serves as a vacation rental. Original wood paneling, restored brass fixtures, and period-appropriate decor create authentic charm. The conversion cost £35,000 and books solid year-round. Proves railway carriage homes can be income generators. Tiny House Listings
The Caboose Hotel
Multiple converted cabooses transformed into hotel rooms. Each maintains the cupola observation deck. Original paint schemes restored. Modern bathrooms fitted into tight quarters. Demonstrates commercial viability of railway carriage conversions.
Beautifully restored Victorian railway station with converted carriages
Common Challenges and How to Overcome Them
Every railway carriage conversion hits obstacles. Here’s how to handle them.
Challenge: Extreme Temperature Swings
Metal structures amplify temperature extremes. Summer heat becomes unbearable. Winter cold penetrates relentlessly.
Solution: Aggressive insulation is non-negotiable. Spray foam minimum R-19 walls, R-30 ceiling. Install thermal curtains on all windows. Use mini-split heat pump for efficient climate control. Plant shade trees on sunny sides. Add window awnings.
Challenge: Condensation and Moisture
Cold metal plus warm interior air equals condensation. This leads to mold, rust, and rot.
Solution: Proper vapor barrier installation. Continuous dehumidifier operation (especially first year). Excellent ventilation with exhaust fans. Monitor humidity levels (keep below 50%). Address any roof or window leaks immediately.
Challenge: Limited Width
Railway carriages are narrow (typically 8-10 feet interior). This constrains furniture and layout.
Solution: Custom-built furniture scaled to space. Murphy beds and fold-down tables. Narrow appliances and fixtures. Embrace the cozy feel rather than fighting it. Extend living space outdoors with decks and porches.
Challenge: Finding Replacement Parts
Original windows, doors, and fixtures are hard to replace when damaged.
Solution: Salvage yards specializing in railroad equipment. Online railroad enthusiast communities. Custom fabrication when necessary. Document everything photographically before disassembly. Join railway preservation societies for parts leads.
Challenge: Moving and Placement
Getting a 30-ton railway carriage to your property is complex.
Solution: Hire experienced heavy haul companies. Get multiple quotes. Plan route carefully (overhead clearances, road weight limits). Obtain all permits before moving day. Have site completely prepared. Budget 20% more than quoted (surprises happen).
Challenge: Financing Difficulty
Banks don’t understand railway carriage homes. Traditional mortgages rarely apply.
Solution: Pay cash if possible. Personal loans. RV loans (if carriage qualifies). Construction loans (requires detailed plans). Seller financing when buying improved property. Credit unions are more flexible than big banks.
Maintenance and Long-Term Considerations
Railway carriage homes need ongoing attention.
Annual Inspection Checklist
✓ Roof condition (rust, leaks, sealant)
✓ Undercarriage rust and structural integrity
✓ Window seals and frames
✓ Door operation and weatherstripping
✓ Foundation stability and leveling
✓ Electrical system safety
✓ Plumbing for leaks
✓ Insulation effectiveness
✓ Exterior paint and rust prevention
Rust Prevention
Metal railway carriages wage constant war against rust. Combat strategies:
- Annual rust inspection and treatment
- Keep exterior painted with rust-inhibiting primer
- Treat any chips or scratches immediately
- Maintain proper drainage around foundation
- Apply rust converter to affected areas
- Consider professional sandblasting and repainting every 10-15 years
Weatherproofing
Seals and caulking degrade over time. Check annually:
- Window and door seals
- Roof penetrations (vents, skylights)
- Floor-to-wall junctions
- Any added structural connections
- Reapply sealant as needed
Heating System Maintenance
Wood stoves: Annual chimney cleaning. Mini-splits: Filter cleaning monthly. Propane systems: Annual professional inspection. Budget $200-$500 yearly for heating system care.
Resale Considerations
Railway carriage homes are niche properties. Limited buyer pool. Excellent for those who love them. Challenging to sell quickly. Best approach: Market as unique vacation rental. Build cash flow while seeking buyer. Emphasize character and story.
Making Your Railway Carriage Dreams Real
You’ve absorbed the knowledge. Now comes the exciting part: making it happen.
Step-by-Step Action Plan
Phase 1: Research and Planning (3-6 months)
- Study local zoning and building codes
- Determine budget (purchase + renovation + land)
- Choose carriage type (passenger, caboose, freight)
- Develop preliminary floor plan
- Research financing options
- Connect with railway enthusiast communities
Phase 2: Acquisition (1-3 months)
- Search for available carriages
- Inspect potential purchases thoroughly
- Negotiate price
- Arrange transportation logistics
- Secure property for placement
- Obtain necessary permits
Phase 3: Site Preparation (2-4 weeks)
- Clear and level site
- Build foundation
- Plan utility connections
- Create access for delivery
- Arrange crane if needed
Phase 4: Delivery and Placement (1-2 days)
- Coordinate with transport company
- Ensure proper insurance coverage
- Have professional photography done (pre-renovation)
- Position on foundation
- Secure and level carriage
Phase 5: Structural Work (2-6 months)
- Roof repairs and sealing
- Floor replacement if needed
- Window and door restoration/replacement
- Rust treatment
- Insulation installation
- Vapor barrier installation
Phase 6: Systems Installation (2-4 months)
- Electrical wiring and panel
- Plumbing rough-in
- HVAC installation
- Solar power (if applicable)
- Water and sewage connections
Phase 7: Interior Finishing (3-6 months)
- Wall covering and finishes
- Flooring installation
- Kitchen build-out
- Bathroom completion
- Painting and decorating
- Fixture installation
Phase 8: Final Touches (1-2 months)
- Landscaping
- Exterior painting
- Deck or porch construction
- Final inspections
- Certificate of occupancy
- Move in!
Total Timeline: 12-24 months for complete conversion (working part-time)
Resources and Community Support
You don’t have to go it alone. Tap into these resources.
Online Communities
- Railway Preservation Forums: Technical advice and parts sourcing
- Tiny House Communities: Design inspiration and building tips
- Reddit (r/TinyHouses, r/DIY): Real-world experiences and problem-solving
- Facebook Groups: Railway carriage conversion groups
Professional Services
- Heavy Haul Transport Companies: Specialized moving
- Tiny House Builders: Some take on railway projects
- Historic Preservation Contractors: Experience with vintage structures
- HVAC Specialists: Insulation and climate control experts
Suppliers
- Railroad Salvage Yards: Original parts and fixtures
- Sterling Rail: Railway equipment marketplace
- Tiny House Appliance Suppliers: Compact, efficient appliances
- Industrial Surplus Stores: Unique fixtures and materials
Inspiration Sources
- Living Big In A Tiny House (YouTube): Excellent conversion tours
- Tiny House Listings: Browse completed conversions for sale
- Railway Heritage Groups: Historical photos and documentation
- Pinterest: Visual inspiration boards
The Bottom Line: Is a Railway Carriage Home Right for You?
Converting a railway carriage into a tiny house is a labor of love. It’s not the easy path. It’s not the cheapest path. But for the right person, it’s the most rewarding path.
You’re a Good Candidate If:
- You love history and unique architecture
- You have DIY skills or budget for contractors
- You’re comfortable with non-traditional housing
- You value character over convenience
- You can handle year-long (or longer) projects
- You live in (or can move to) a permissive jurisdiction
- You embrace the challenges as part of the adventure
Reconsider If:
- You need turnkey, move-in-ready housing
- Your local codes prohibit alternative dwellings
- Your budget is extremely limited
- You’re not handy and can’t afford contractors
- You want standard homeowners insurance
- Quick resale is important to you
- You’re not prepared for ongoing maintenance
Your Journey Begins Here
Railway carriage homes represent more than alternative housing. They’re acts of preservation. They’re creative expression. They’re connections to history. Every rivet, every window, every creaking floorboard tells a story. Now you get to add your chapter.
The rails that once carried passengers across continents can carry you into a new way of living. A way that honors the past while embracing the present. A way that turns dreams of life aboard the rails into daily reality.
Your converted railway carriage is waiting somewhere. Maybe rusting in a salvage yard. Maybe advertised on a forgotten website. Maybe sitting on a siding, overlooked by everyone except you.
Find it. Rescue it. Transform it. Live in it.
All aboard your new life.